The Bitcoin Cash (BCC/BCH) fork was controversial and many expected it to quickly die, which is why Coinbase announced ahead of the fork that customers would not have access to their Bitcoin Cash coins unless they withdrew their funds before the fork occurred. After the fork, Bitcoin Cash didn’t die right away, and the price is sufficiently high that it lead customers to demand Coinbase change their plan, which they did by announcing customers will be able to sell their BCC by Jan 1, 2018.
But Jan 1 is a long way off, Bitcoin Cash might even be worthless by then and it’s worth something now. Sadly if you had BTC in a standard vault or wallet with Coinbase, you must wait till Coinbase adds support to their site for you to access your BCH.
But for folks with multi-sig vaults set up by Coinbase for which they indicated they wanted to manage their own security, the good news is these folks can sell their BCH coins without delay. This is conditional on these users still possessing the key data they were given when they first set up the vaults, which is necessary to fill in their Multisig Vault recovery tool form. Since I had practiced extracting BTC myself using their tool, I knew I had the necessary key data, if I could only figure out how to apply it on the BCH network instead. This took a lot of work to figure out, and some help from others in the community, including some help that paid a small “bounty” for.
I share it with you since I am not alone in wanting to exchange my BCH. As it took quite a bit of work to derive these steps, and more to write it down in a consumable fashion for others, please consider donating some coin (BTC or BCH) to this address:

Update 1/6/2018: Recent changes to network servers made these instructions difficult to follow in some circumstances. This blog post has been updated slightly so that these instructions work again.
Entry requirements
What you absolutely must have in order to complete these steps are control of 2 keys in your Coinbase multi-sig vault and knowledge of the 3rd public key. Coinbase would have shown you a page with this data:
- User key
- Seed
- Public key
- Shared key
- Seed (encrypted)
- Public key
- Coinbase key
- Public key
The shared key seed is encrypted with the password you gave Coinbase expressly for this vault. You must be in possession of that as well.
If you’re missing any of the public keys, Coinbase will readily remind you of them if you visit your vault and click to view “Vault details”. However if you lack the seeds, there does not appear to be a way to recover them, and you may have to just wait for Jan 1, 2018 with the rest of the folks at which point Coinbase should allow you to transfer them elsewhere with the 2 private keys it knows (so long as you remember your multisig vault password).
You do not have to understand the crypto behind bitcoin.
Steps to liberate your BCH
Important Disclaimer: Moving cryptocurrency around is an irreversible business, and this blog post takes you through manual steps using low-level tools. By a fault in following these steps, or a fault in the steps themselves as I have written them or the tools you’ll use, your funds may be irreversibly lost. The steps I take you through and the tools I prescribe worked for me, and I expect they’ll work for you to. But in sharing them in good faith I cannot take responsibility for loss of your coins.
One precaution I took the first time I did this, and I recommend you do as well, is to try it out using an address with only a small amount of coin that could possibly be lost. Confirm it is received on the other end, then go back and repeat the process for the addresses holding the larger amounts of coin. I’ll point this out at an appropriate time down below as well.
Find the individual addresses, amounts, and their private keys
Due to changes to network services you will need to download transactions from and broadcast to (that now require same-origin policy for AJAX calls), only FireFox with the CORS Everywhere plugin installed and active will allow you to complete the steps in this blog post.
Now with your index.html page open, fill in the initial three public key fields and click “Continue”. This will download information from the BTC network and populate your addresses and their individual balances. Many of the addresses may have a 0 balance and be gray, while a few will be black print with positive balances. These are the addresses we will need to collect individual private keys for.
But first, we need to provide the user and shared seed information. If you’d like you can first disconnect your computer from the Internet to assure yourself that this confidential information isn’t being transmitted to a thief. Now go ahead and fill in the fields for the shared encrypted seed and the password to decrypt that shared seed. Also fill in the user seed. This tool also requires that you provide an address to send the coins to. We will not transmit coins with this tool, but go ahead and generate a valid BTC address and paste the public address into the tool. Or you could just go back to Coinbase and get a receiving address for one of your accounts and use that address here.
Now go ahead and click Continue. No need to worry about the transaction fee since again, you won’t be broadcasting the created transaction. It will take a few seconds for the tool to decrypted the shared seed. When it is done, a very long hex code will be printed (which is the transaction we will not use) and below that is your (decrypted) shared seed. You won’t need that either, but I added it to the print out of the tool for my own curiosity.
So if we won’t use the transaction, nor the decrypted shared seed, what did we do all this for? The answer is for an object that the javascript in the web page generated that has a bunch of other information that you need. This ‘object’ is stored in a variable called ‘document.vault’, and is the real reason behind my own fork of this tool.
Hit F12 on your keyboard to bring up the Javascript debugger. Make sure you’re looking at the debugger’s “console” window. This is where you will type several javascript commands. It will help you understand what you’re doing if you’re a programmer, but I’ll try to write these steps so that non-programmers can complete these instructions as well.
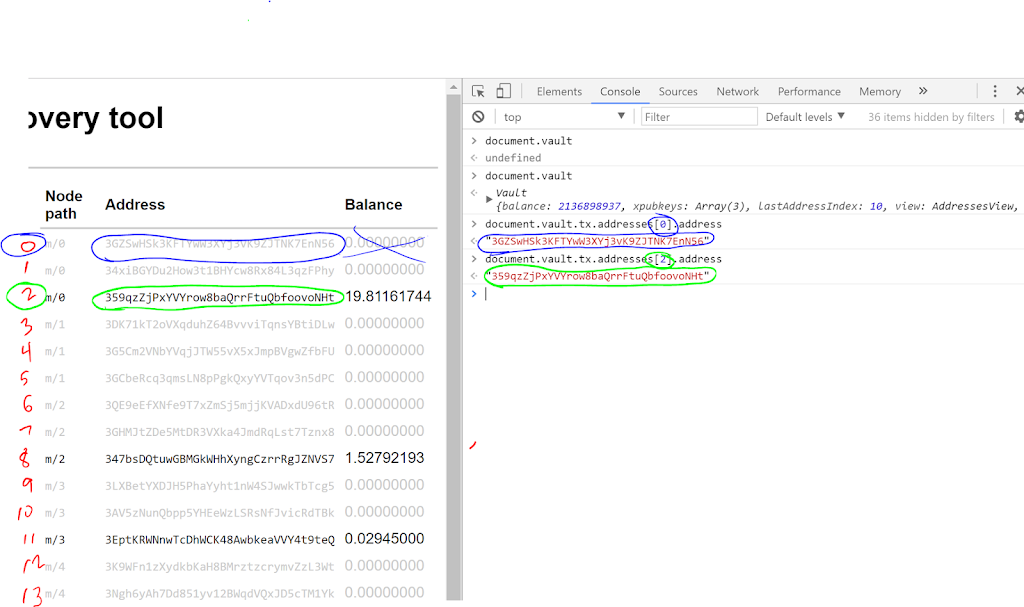
Now with your debugger console and the addresses with non-zero balances side-by-side, it should look something like this:

We’re going to repeat several steps for each address non-zero balance. Note that the balances shown in this tool are your BTC funds — not the balances on the BCH fork. If you haven’t transferred any money out of your multi-sig vault since the fork, you can look at the balances reported by this recovery tool. Otherwise, you should copy and paste each address into https://blockdozer.com/ to see if it has a non-zero balance.
For each address with a non-zero balance we will look up several strings (i.e. sequences of characters) and you will need to record each of them. It is very important that you get each string recorded exactly, so you should copy and paste them into another file you create rather than typing them or writing them out by hand. Be careful how you store the data you collect and do not share it with anyone you don’t trust, since it can be used to access your funds on the BTC and BCH networks.
- Determine the row # that the non-zero address appears on. In the example above, the first address with a non-zero balance is the third row. In Javascript counting starts at 0 instead of 1 so we say that the first non-zero address is at index=2 in the example above. In each command below, I will italicize the 2 that we obtained in this step. You should replace that italicized number with the actual number you come up with from your vault.
- Verify we counted right by printing the address in the javascript console using this command:
document.vault.tx.addresses[2].address
We should then see the same address printed in the javascript console that we found on the left. This is demonstrated in the above screenshot. - Next we need to get the “redeem script” for this address using this same index. The redeem script is a long hex string. Print this redeem script with this command:
document.vault.tx.addresses[2].redeemScript.toHex()Record this redeem script. - Record the balance reported for this individual address. Note this is your BTC balance, which provided you haven’t spent or received any funds to this vault since the fork should match your BCH balance at this address.
- This address has two private keys that you can derive for this address. Each are a 52 character string. Print them out with these commands and record their output:
document.vault.tx.addresses[2].getPrvKey(document.vault.tx.hdWallets[0]).toWIF()
document.vault.tx.addresses[2].getPrvKey(document.vault.tx.hdWallets[1]).toWIF()
Create and sign transactions to move your BCH to another address
You will need to have a BCH address to send your Bitcoin Cash to. Presumably one that’s easier to control via a BCH wallet application or a cryptocurrency exchange. Since I wanted to sell my BCH, I created an account on https://www.hitbtc.com/. Setting up this account was simple and immediate, and didn’t even require an identity proof (IIRC). In addition, trades on this exchange have a low fee of 0.1%. I transferred my BCH there and sold them there for BTC. I then transferred my BTC to Coinbase where I could keep them, or sell them for USD. Wherever you get your BCH receiving address, keep it handy for later.
Download the BCH fork of coinb.in (diff) and open the index.html file in your favorite browser. We won’t need to do any F12 debugging this time. We will use this local web application instead of the coinb.in web site on the Internet because BCH transactions are created and signed differently than BTC transactions.
Set the configuration to use Bitcoin Cash:
- Click New -> Transaction within the coinb.in app that’s running on your local computer.
- Click to expand Advanced Options
- Under “Network”, click the “settings” link.
- In the “Network” setting, select “Bitcoin Cash (mainnet)”
- Click “Submit Query”
You will also need to determine how much of a transaction fee to offer the miners for verifying your transaction. This is usually calculated for you automatically by most wallet apps including Coinbase, but since coinb.in is such a low-level application, we have to calculate it ourselves. The fee is based on the size of your transaction (not the amount transferred, but the physical size of the string that describes the transaction). Multi-sig transactions are larger than most other transactions and I found mine averaged around 350 bytes (i.e. characters). I used bitcoinfees.21.co to find the going rate for transactions at the time. If you use this site, be sure to switch it to show fees in BTC rather than “Satoshis” or any other unit. I couldn’t find any site that showed fee averages for the BCH network, so I used this site to get an idea of what was normal, then I used Blockdozer Explorer to look at the latest block and picked a few transactions to see what the fee was there. Let’s look at an example:

The above screenshot comes from bitcoinfees.21.co and tells me that I can expect to spend about 0.0000018 BTC per byte for each transaction I make. If I offer less than that to the miners, they may take significantly longer to verify the transaction, which means I wait longer to get my funds recognized as transferred at the receiving address.
Now let’s take a look at a recent BCH block and see how that compares, over at Blockdozer:

Now using the data you recorded in the previous section using the fork of the coinbase Multisig-tool, we will repeat several steps for each of the non-zero balance addresses you collected data for. A good precautionary technique would be to pick an address that has the lowest balance of all your addresses first, and wait for the whole transaction to be verified to confirm that everything works before you proceed with the addresses with the larger balances. So again, for each address you want to transfer funds from complete these steps:
- Connect to the Internet because once again, transactions history for your addresses will need to be downloaded.
- Click New -> Transaction again. If the “Advanced options” panel is expanded, collapse it now.
- Paste the redeem script that you recorded earlier into the first text box and click “Load”.
- After the Inputs tab on the page updates to show a non-zero balance, you can disconnect your computer from the Internet if you wish in order to be comfortable that your private keys won’t be transmitted to anyone else.
- Paste the BCH receiving address you obtained earlier into the “Address 1” field (I used one given by https://www.hitbtc.com/).
- Fill in the Amount to be transferred. Important: all funds at this address will be spent. The difference between the balance at that address and the amount you put in here will be your ‘transaction fee’ that you offer the miners for verifying your transaction. So you should calculate it like this: address balance – fee = Amount. So supposing you had 1.5 BCH at this address and the fee you were offering for this transaction was 0.001632 BCH, you would enter 1.5 – 0.001632 = 1.497984 into the Amount field here.
- This would be a great time to express your thanks for the research and time that went into this blog post so you could access your funds. If you feel so inclined, click the “+” symbol to the right of the “Amount” field to add another receiving address and paste in 1Eft74zCo8ncqLWamgzpr418UtRTFPtaRL and an amount you feel good about. Be sure to subtract that from the amount received by the first address so that the Transaction Fee remains unaffected.
- Double-check that the calculated Transaction Fee field just above the Submit button shows the transaction fee you intended (0.002016 in our example). If it does not, recalculate the Amount(s) for the receiving address so that their sum is equal to the balance at the sending address minus the intended transaction fee.
- Click Submit. This will not transmit the funds. But note the transaction string that is generated in the green panel. Note its size in bytes is displayed below it. This size is just the start. It will get larger when you sign it.

- Copy the hex string that is your Transaction to your clipboard.
- Click the Verify tab at the top of the web page. Paste your transaction into the box and click Submit. Review the receiving address and amount to double-check your work.
- Click the Sign tab at the top of the web page.
- Paste your (still unsigned) transaction into the big text box just above “Advanced options”.
- Now also from your notes, you should have two private keys associated with the sending address. copy and paste the first one into the “Private Key” text box above the transaction box.
- Click Submit. The transaction is signed with the first private key and reproduced in a green box.
- Verify that the signed transaction is longer than the original transaction. If there was a failure, the transaction will often simply be reprinted without a signature or any warning. You can detect this failure by seeing that the transaction length hasn’t increased. If you find yourself in this case, double-check the steps you completed earlier and repeat till you get a longer transaction printed out.
- Now copy and paste this once-signed transaction from the green box into the transaction input box above it, replacing your original unsigned transaction.
- Replace the Private Key in the first text box with the second private key associated with the sending address that you recorded from the multisig-tool steps of the previous section.
- Click Submit again. This should sign the once-signed transaction with the second key, creating a twice-signed transaction that is longer in length than either of the prior two. Verify that it is longer. Mine is 339 bytes at this stage, which is very close to the 340 bytes I estimated my fee based on, so we can proceed. If your transaction size estimate is far off of this actual transaction length, you should go back to the step where you set the transaction fee, regenerate the transaction with a more appropriate fee and re-sign.
- Your transaction is now twice signed and ready for broadcast. Copy the signed transaction to your clipboard. Let’s check your work one more time by click the Verify tab at the top of the web page and pasting your signed transaction into the text box and click Submit. Verify that the “Signed?” column shows it has been signed two times.
- Finally, to broadcast your transaction: with your twice signed transaction text on your clipboard, paste it into the text box of https://blockdozer.com/insight/tx/send and click “Send transaction”. You may want to take note of the transaction ID so you can “follow” it until it receives a confirmation by the blockchain.

If you found this blog post helpful, please consider donating 1% of the BCH you were able to liberate to 1Eft74zCo8ncqLWamgzpr418UtRTFPtaRL, or any other amount of BCH or BTC to that same address you feel would appropriately express your thanks. Thank you, and enjoy reaping the benefits of the BCH fork!
Please also leave a comment indicating how this worked for you. If there were confusing/missing steps, etc. I will do my best to make corrections to this post based on the feedback I get. But if the steps work and you find yourself suddenly feeling richer, that would be great to hear as well.
Great article, but this doesn't seem to be working anymore because the bitcoin cash api and ajax security changed on the site it uses. I was able to disable my client side browser ajax security to get the redeem script balance to load, but the transactions still dont sign correctly. Any ideas?
Which step doesn't work any more? I'm surprised to hear that AJAX is relevant for anything since IIRC each step deals with a local web app or a live web app, so I don't see any room for some API change to be relevant.
Adding the redeem script and onward. Basically Blockdozer.com changed their AJAX cross-site security policy that messes with the import. But you can solve that by disabling the ajax same-origin policy on Chrome. At least that's what I did.
The real problem is that there's some weird formatting going on now when the raw transaction comes back. See this solution I'm linking on stackexchange. The author notes on top that it doesn't work anymore and sent a note to the coinbin forum.
https://bitcoin.stackexchange.com/questions/61053/how-to-claim-bitcoin-cash-from-block-io
I think it's just a transaction formatting issue but I'm not sure how to fix it.
Great article. I have an unrelated question. When I import the 3 xPub keys to Electrum, it doesn't show any balance. Why is that? What method is the MultiSig tool using to retreive the balance in the addresses? I thought that Electrum would be able to do the same.
Basically, I would like manage my Coinbase vault from Electrum.
I don't know. But I believe the public keys have to come together in some cryptographic way to form addresses that the public keys individually do not do. So my guess is Electrum is treating them as individual keys or seeds rather than multiple seeds behind multi-sig addresses.
One problem is that if the Bitcoin has already been removed from the multisig wallet it shows zero balances, and thus even if you know what sigs go with the BCC balance you can't use the document.vault.tx.addresses[2].redeemScript.toHex() because they are invalid. ;-(
Yes, I've heard a few folks report this problem. If you deposit a small amount of BTC back into your multi-sig vault, the recovery tool should work again — but you'll have to test each and every address for a BCH balance manually.
One question when you search the balances only show the actual balances, for exampple if I have 0.01BTC in coinbase multisig vault only show this amount, but not show the old amounts…and you recover balances of btc to btcash….I put a high index 3000 but only show me a black balance with the actual amount of my vault. Not show the first inputs of BTC
I have a solution that is working….
1)In your version of the multisig tool change
INSIGHT_API_URL_ROOT: "https://bitcoincash.blockexplorer.com/api/",
You can do this in either the mutisig.js file or the individual source files and recompile.
This allows the mutisig tool to get the unspent outputs from the cash blockchain… Then follow your instructions to get the address redeem and private keys….
2)The version of https://github.com/OutCast3k/coinbin/
Now everyplace in source it has a hardcoded:
http://blockdozer.com/insight-api/
url you need to replace it with
https://bitcoincash.blockexplorer.com/api/
I believe this was just two filesI modified js/coin.js and js/coinbin.js
After doing all of that I was able to move my BCH coins offof my mutisig wallet into a differnt BCH wallet…
Hope that is helpful…. If andrew wants the modified file just ask and I'll put it someplace for you.
I worked around the 0 BTC balance issue. And the recovery tool works in FireFox (and fails in other browsers due to a change in the ajax origin policy).
https://github.com/AArnott/multisig-tool/releases/tag/bcc-1.0.1
Thanks for getting this working again! Firefox with cors + your update did the trick. I'll send you a tip as soon as coinbase decides to not be slow 🙂
FYI when i tried to broadcast the transaction in the app it gave an error "parameter 1 must be hexadecimal string (not 'send'). Code:-8". But going directly to blockdozer at https://blockdozer.com/insight/tx/send and pasting the transaction worked for me.
You're welcome!
Ah yes, I found that broadcast feature was broken yesterday too, but I forgot to update the post with that. I've done so now. Thanks for the tip.
How does this work? BTC balances would still show up as zero?
This is not working. Balances still show as zero. I've looked up the addresses on bitcoincash.blockexplorer.com and the balances are there but the tool is not showing them.
I also tried changing INSIGHT_API_URL_ROOT to "https://bitcoincash.blockexplorer.com/api/" but it didn't work either. I guess we are stuck with Coinbase's solution, whenever that happens…
anyone getting this to work at this point? Coinbase never released my BCH. Paul Breed's suggestion worked partly. I was able to "see" my non-balance funds. My problem is after I send my redeem script I get the message "Retrieved unspent inputs from address", but…there is zero balance in output and input tabs. I know what the amount is supposed to be (checked on blockdozer) but I need the other info (transaction number, script, amount etc..) Any help???
In step 3 of the coinb.in section, after pasting the redeem script and clicking "Load", I get the message "Unexpected error, unable to retrieve unspent outputs!"
I'm using Firefox, with the CORS Everywhere plugin installed and active. Plus I've double checked that the address corresponding to the redeem code for sure has a BCH balance.
What could be going wrong?
Yeah it's kinda odd. I was checking the multisig tool code but I can't find anything. :/
I am at the final step (#21) where I am attempting to broadcast the raw transaction on https://blockdozer.com/insight/tx/send. This is the error I am getting when I paste my signed text. "Raw transaction data must be a valid hexadecimal string." What is the solution?
I was able to get the tool showing balances by modifying multisig.js but when I enter my user and shared seed and hit continue the button changes to a please wait button and does not give me a hex code. Any ideas on what I may be doing wrong?
When the error message comes back, hit the refresh button and see if it changes, and if any amount appears in the input or output tabs.
Great info, thanks for this article. Will try to submit my token in coinbase for trading.
I've lost my patience with Coinbase and am giving this a shot. Everything has worked great except I can't get the document.vault objects to be returned. I long moved my BTC out of my multi-sig wallet and, as suggested, moved a little back but, still, no luck. I've manually verified which address have BCH within them but can't generate the transaction since I can't locate the document.vault objects anywhere within my FF debugger (console or otherwise). Any ideas? Is this hopeless if one has moved their BTC out of their original wallet? Would love to send you money for this help if only I can get to it!
When I decrypt the shared seed (Step 3 w/n the GUI) the only output I get is "Your transaction will appear here in raw hex format …" and my decrypted shared seed. I believe that because I never get the raw transaction output I never see my document.vault objects needed for this to work. Any ideas?